Tests are very important to deliver a product with better quality and to feel comfortable when we make changes to the project. There are different types of tests
-
Unit tests
-
Integration tests
-
End-to-end tests
-
And many more
In this article, we will talk only for Unit tests. In unit testing we are testing the smallest unit of our code, the piece should be independent and to work well standalone. The unit testing is an automated way to test your code, and what I mean by that. You can write once the test for one component and after that when you add additional functionalities all tests that you have written will be available with one command.
E.g If you have a component that converts Celsius to Fahrenheit you can test once the formula for conversion and if you add something you can run the test again to check if it is still working.
We need an application to test, I made a simple weather application and we will write simple tests for it.
You can download the application from this GitHub link. https://github.com/IvanAbadzhiev/React-simple-testing-tutorial
You can find instructions on how to run it in the Readme file.
Prerequisites
- NodeJS
- Jest
What to test?
This is the question that everyone who is starting with testing asks. You should test everything that can mess.
I will start first with the helper function for converting celsius to Fahrenheit.
export const celsiusToFahrenheit = (temperature) => {
   return (temperature * 9/5) + 32;
};
It is very simple here and we don’t need something React specific that can make the process complex. Create a new folder in the root of your project and create a file called helper.test.js
The extension “.test.js” is very important because Jest will know that this file contains tests and should be executed.
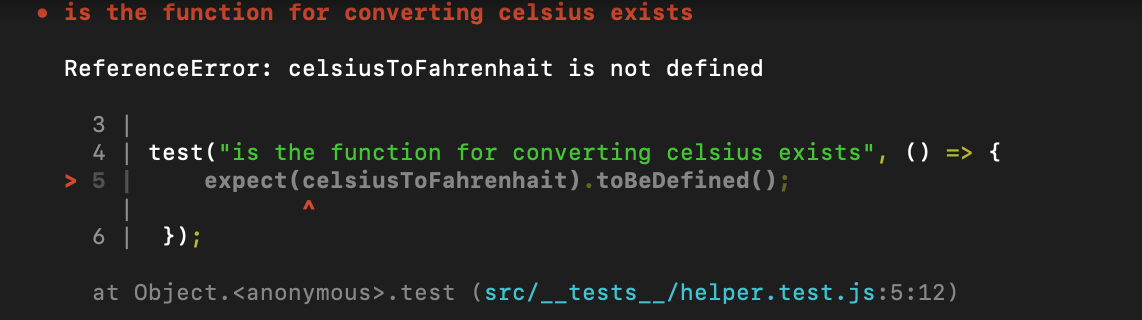
Now in our test file we should import the function that we will test and write tests on it. The rule here is to start with the easiest tests for example if the function is defined.
import {celsiusToFahrenheit} from "../utils/helper";

test("is the function for converting celsius exists", () => {
   expect(celsiusToFahrenheit).toBeDefined();
});
To execute the test run in the terminal
yarn test
or
npm run start
And the test will pass successfully.
Important: Always make your test to fail once!
It is possible your “test” to not test the right code or to be always successfully passed. Now we can change the name of the function to something else like celsiusToFahrenhait and the test will fail.
Now we can write tests for the function and we need to cover different scenarios for the input.
- Are 12 degrees celsius is equal to 53.6 degrees Fahrenheit (you can add more cases to be sure that the formula is working well)
- Input with negative values e.g – 10.
- Invalid input like string value – Always test for invalid input.
- Be creative, find a way to break the function.
test("12 degrees celsius should be 53.6 fahrenheit", () => {
   expect(celsiusToFahrenheit(12)).toBe(53.6);
});

test("-10 degrees celsius should be 14 fahrenheit", () => {
   expect(celsiusToFahrenheit(-10)).toBe(14);
});

test("String values should throw an error", () => {
   expect(() => celsiusToFahrenheit("test")).toThrow("The temperature is not a number");
});
Challenge: Create a function that calculates Fahrenheit to celsius (The opposite) and write suitable tests for it.
Test the rendering and the functionality
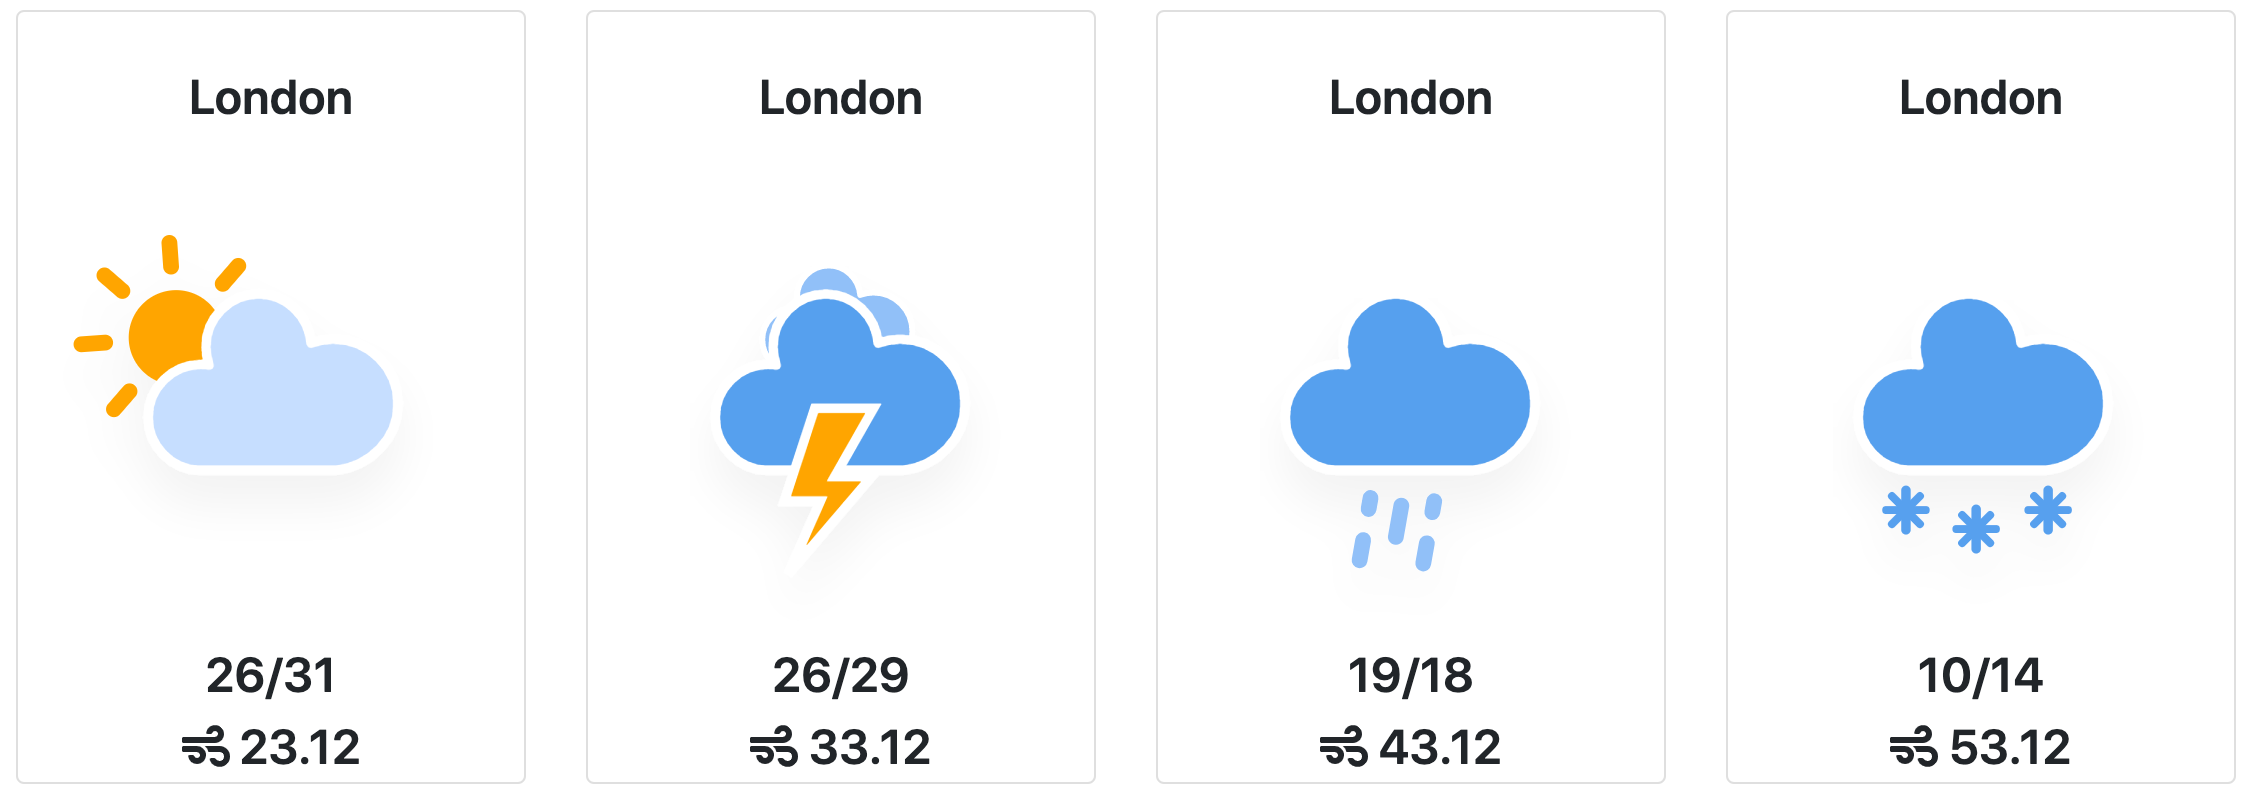
Our app is very simple, we don’t have API calls to get the dynamic forecast for a particular city, because we will have some “CORS” problems which are not part of the article. We have only the components for rendering the forecast and simple state that change the temperature unit from Celsius to Fahrenheit and vice-versa. Let’s start with the container that holds the cards with different days.

The test that we can make here is very simple, we just need to see if we have 4 cards printed on the page. We don’t need to check the temperature, icon, wind speed and more, these tests will be covered in the WeatherCard test file.
Shallow vs Mount rendering
To test our component we need to render it, but we don’t have DOM in the terminal, it is only in the browser. The solution for rendering here is coming from enzyme. There are 3 types of rendering in Enzyme library
Shallow – Most used for Unit testing. Shallow will render just the component without the children inside the component.
E.g
const Form = () => {
   return (
       <div>
           <h1>Form</h1>
           <input />
           <DatepickerComponent/>
       </div>
   );
In the code here we have a simple form with simple input and DatePickerComponent, by shallow this component will be not rendered, it will be only <DatepickerComponent/>
Shallow is much faster for that reason, you can imagine if you have one component with thousands of nested components, and if you have 1000 tests on similar components will take a lot of time just to run the tests.
const component = shallow(<WeatherCard {...props} />);
Mount – Is used when you need to render all components in the tree. There are some cases that you will need that but more often you will need shallow to isolate the component. Also with Mount you can test lifecycle methods like componentDidMount and componentDidUpdate.
const component = mount(<WeatherCard {...props} />);
Render – is used when you need to run just the render function of the component. It is very useful for some advanced visualisation tests
const component = render(<WeatherCard {...props} />);
You can find more information on the different render methods in enzyme here:
https://gist.github.com/fokusferit/e4558d384e4e9cab95d04e5f35d4f913
Tests for App.js
So let’s check what we need to cover for App.js
- App.js should be rendered
- 4 cards should exist in the component
- The default value of the temperature unit dropdown should be “celsius”
- When we change it, should show the new value
If you prefer, you can write first the list with the tests and implement it later. Here is the code representation.
beforeEach(() => {
   component = shallow(<App />);
});

test("It should render App.js", () => {
   expect(component.exists()).toBeTruthy();
});

test("It should render 4 Weather Cards", () => {
   expect(component.find(WeatherCard).length).toBe(4);
});

test("Celsius should be the default value", () => {
   expect(component.find("select").prop("value")).toBe("c");
});

test("It should change the measurement unit", () => {
   component.find('select').simulate('change', {target: { value : 'f'}});
   expect(component.find("select").prop("value")).toBe("f");
});
Now let’s test the WeatherCard component. Here the list is a bit longer.
- The component should be rendered
- Check the city name from props, is it printed on the card
- The icon from props is it set in the URL
- The min and max temperature is it shown
- The min and max temperature in Fahrenheit is it converted
- The wind speed should be shown
- The icon for the wind should be printed (optional)
import {shallow} from "enzyme";

import WeatherCard from "../Components/WeatherCard";

const props = {
   city: "London",
   unit: "c",
   minTemp: 12,
   maxTemp: 16,
   icon: "windy",
   wind: 32
};

let component;

beforeEach(() => {
   component = shallow(<WeatherCard {...props} />);
});

test("It should render WeatherCard", () => {
   expect(component.exists()).toBeTruthy();
});

test("It should render the city name", () => {
   expect(component.find(".card-title").contains("London")).toBe(true);
});
This is just a basic example of how you can test a particular app, but the testing is a very creative process you should find a lot of different scenarios that can happen and there is no article or book that can make you better with testing your code, you can master that with practice (a lot of practice).
Challenge: Write the other tests alone
If it is not enough for you, find a Github repository and write tests for it. A lot of open source projects will appreciate that.